In this post today, I’ll share about how I setup blue green deployment for my
Phoenix application using nginx running on a single machine. This post is
made possible thanks to this article about Custom Blue Green Deployment with Nginx
And Gitlab CI.
The core idea to make blue green deployment possible for Elixir releases with
nginx is through:
- Running two releases at the same time in your remote server.
- Switching traffic to new release through linking to a different
nginxconfiguration to/site-enabledand reloadnginx.
This approach is only suitable for smaller scale system or hobby projects. I have never operate any serious production system with this setup. Hence, I’ll advise you to offload this to something more battle tested for your real world high traffic production sytem.
While this article is written specifically for Elixir/Phoenix deployment, similar approach and scripts can apply for any web application running behind nginx to achieve blue green deployment.
Table of Content
- Prerequisite
- Following Along
- Setting Up
nginx - Running two copies of our apllication
- Promoting our green version to live
- Running migration and console
- Deploying new blue and green version
- Glue it all together
- Wrap Up
Prerequisite
Before we begin, this post assume you know how to:
- Configure Elixir/Phoenix application for production release
- Setup nginx on production machine to be used as a reverse proxy to direct traffic to our application.
- Build and deploy your Elixir/Phoenix application
This post also reused majority of the bash script that I have written in the
previous blog posts about building and deploying Elixir releases (with some changes to
cater the needs to make blue green deployment happen).
Following Along
While writing this post, I have gone through a few iteration to setting up and down the environment with Vagrant. So if you are interested to follow along with it or experiment it locally, you can use the repository.
The README in the repository will contain more details on the required setup to follow along in this article.
Setting Up nginx
Before we go into details on how we can setup our Blue Green deployment, it’s
important for us to understand the building blocks that make it possible. Let’s
start with understanding how nginx can help us with that.
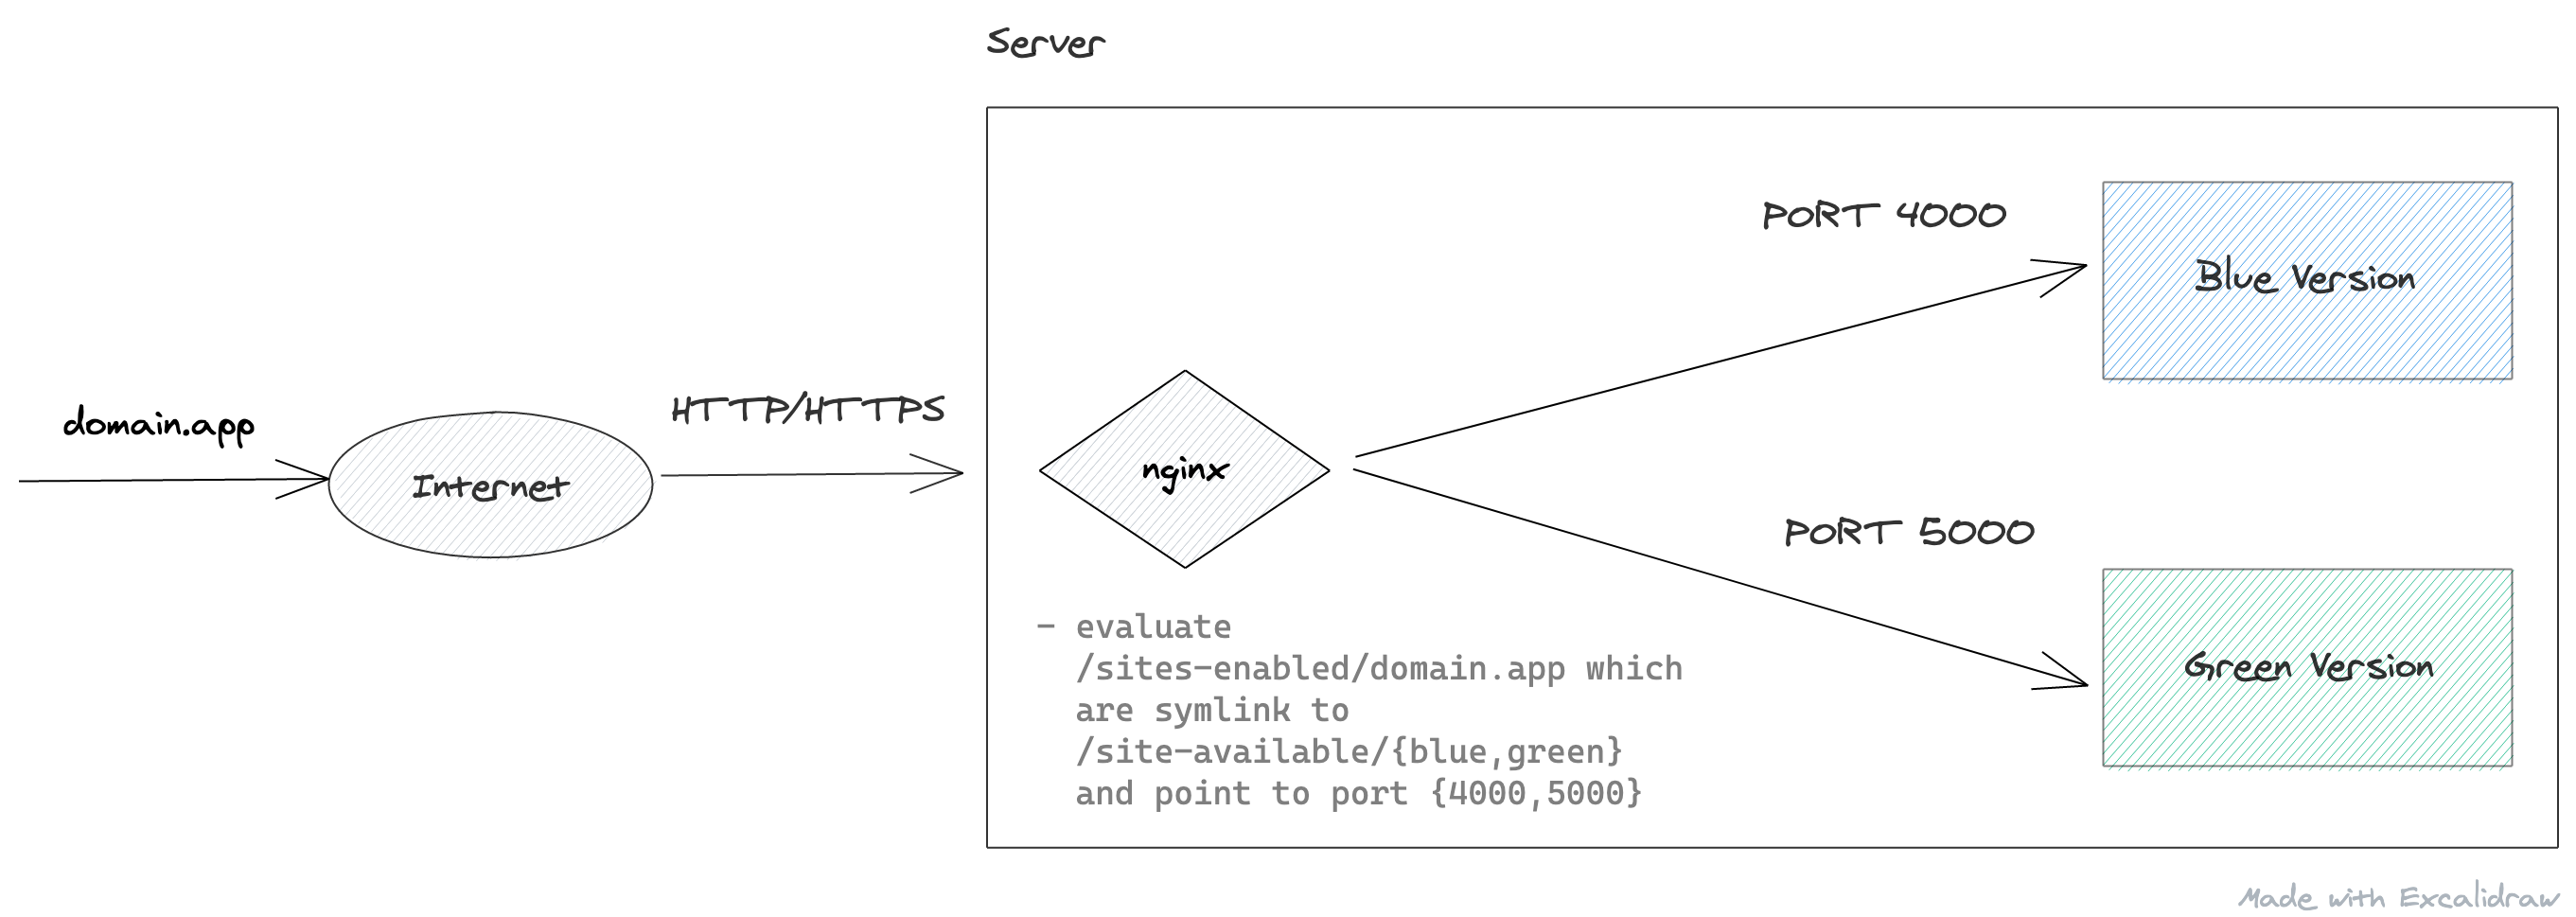
Basically:
- we use nginx as a reverse proxy to forward requests received from internet to our application process.
- nginx forward the traffic differently
based on our configuration at
/etc/nginx/site-enabled/domain.app. - which are symlinked with
/etc/nginx/site-available/{blue,green}. - Each configuration file tell nginx to direct the traffic to the blue/green version of our application process at different port.
Let’s setup our nginx as above.
Blue Nginx Configuration
Let’s start by writing our blue (also our initial) nginx configuration file
(refer from Phoenix Documentation) and placed it
under /etc/nginx/sites-available/blue:
upstream phoenix-blue {
  # Assuming your application is running on PORT 4000
  server 127.0.0.1:4000 max_fails=5 fail_timeout=60s;
}

server {
  server_name domain.app;
  listen 80;

  location /deployment_id {
    return 200 "blue";
  }

  location / {
    allow all;

    # Proxy Headers
    proxy_http_version 1.1;
    proxy_set_header X-Forwarded-For $proxy_add_x_forwarded_for;
    proxy_set_header Host $http_host;
    proxy_set_header X-Cluster-Client-Ip $remote_addr;

    # The Important Websocket Bits!
    proxy_set_header Upgrade $http_upgrade;
    proxy_set_header Connection "upgrade";

    proxy_pass http://phoenix-blue;
  }
}
We are putting it in sites-available instead of sites-enabled because as
demonstrated above, we would need to symlink different configuration file to
our domain. Now we can symlink our configuration file to sites-enabled
with:
sudo ln -sf /etc/nginx/sites-available/blue /etc/nginx/sites-enabled/domain.app
then, we can reload our nginx services to have it use our updated configuration:
sudo systemctl reload nginx
In your machine, curl domain.app/deployment_id, you should see a blue text as a
result.
Assuming you have your application process listening to port 400, visiting to
domain.app will display your application correctly.
We have now setup the blue version of nginx for our application. Let’s proceed to setup the green version next!
I don't own domain.app. How can I curl that?
To do that, you can modify your /etc/hosts file
in your local machine. (Or any equivalent file/configuration in
Windows)
Here is how my hosts file looks like in my local machine,
where I'm poiting domain.app to the local IP of my Vagrant VM.
192.168.33.40 domain.appThis work because by default, our local machine will first hit
/etc/hosts to get the hostnames to IP address mapping before
hitting any DNS.
Green Nginx configuration
To be able to blue green deploy, we would need another nginx configuration that
point to our green application process. It would look very similar with the
blue version configuration with some minor changes as follow in
/etc/nginx/sites-available/green:
# Define another upstream and point to a different PORT
upstream phoenix-green {
  # Assuming your 'green' application is running on PORT 5000
  server 127.0.0.1:5000 max_fails=5 fail_timeout=60s;
}

server {
  server_name domain.app;
  listen 80;

  # Return 'green' instead.
  location /deployment_id {
    return 200 "green";
  }

  location / {
    allow all;

    # Proxy Headers
    proxy_http_version 1.1;
    proxy_set_header X-Forwarded-For $proxy_add_x_forwarded_for;
    proxy_set_header Host $http_host;
    proxy_set_header X-Cluster-Client-Ip $remote_addr;

    # The Important Websocket Bits!
    proxy_set_header Upgrade $http_upgrade;
    proxy_set_header Connection "upgrade";

    # Point to our upstream defined above.
    proxy_pass http://phoenix-green;
  }
}
To promote our green application to live, is to symlink it to be used as our domain configuration with the following command:
sudo ln -sf /etc/nginx/sites-available/green /etc/nginx/sites-enabled/domain.app
follow by reloading our nginx service configuration:
sudo systemctl reload nginx
curl domain.app/deployment_id and you’ll see a green
text returned. However, if you try to visit domain.app and visit
other path of your application, you might get a 502 Bad Gateway.
╰─➤  curl domain.app/deployment_id
green%
╭─kai at KW.local ~/Desktop/mini-hackathon/life ‹1.11.3-otp-23› ‹main*›
╰─➤  curl domain.app/health
<html>
<head><title>502 Bad Gateway</title></head>
<body>
<center><h1>502 Bad Gateway</h1></center>
<hr><center>nginx/1.18.0 (Ubuntu)</center>
</body>
</html>
That’s because we
haven’t run any copy of our application on port 5000 yet as specified in
our nginx configuration.
Let’s revert our changes here by promoting our blue version to live at this moment first:
sudo ln -sf /etc/nginx/sites-available/blue /etc/nginx/sites-enabled/domain.app
sudo systemctl reload nginx
We will be promoting our green version to live after we run the green copy of our application successfully.
Getting Not Found
If you curl and get `Not Found`, try removing the default nginx config
which are /etc/nginx/sites-available/default and
/etc/nginx/sites-enabled/default. Then, try again.
Running two copies of our application
Since we have been relying on environment variable for our port value, to
deploy another copy of our application on a different port, should be as
simple as changing the PORT value right?
So, all we need to do is to just update part of our bash script to conditionally deploy our release with different ports! Easy. So, here’s what we got:
if [ "$deploy_version" = "blue" ]; then
  ssh $HOST "source ~/$APP_NAME/.env && PORT=4000 ~/$APP_NAME/$APP_VSN/bin/$APP_NAME daemon"
else
  ssh $HOST "source ~/$APP_NAME/.env && PORT=5000 ~/$APP_NAME/$APP_VSN/bin/$APP_NAME daemon"
fi
But, how do we know about our current live version?
Remember that /deployment_id in our nginx configuration? That’s how we can
get our current live version:
LIVE_VERSION=$(curl -s -w "\n" "https://domain.app/deployment_id")

if [ "$LIVE_VERSION" = "blue" ]; then
  deploy_version="green"
else
  deploy_version="blue"
fi

# The previous bash script
# continue here...
We are done right? Not quite. If we run our deploy script and go into our
server and check with lsof (list open file description):
$ lsof -i :5000
#=> empty result

$ lsof -i :4000
COMMAND   PID    USER   FD   TYPE DEVICE SIZE/OFF NODE NAME
beam.smp 5162 vagrant   20u  IPv6  39660      0t0  TCP *:4000 (LISTEN)
You’ll see that our application release doesn’t get started successfully.
Run multiple copies of same Elixir release in a single server
Let’s attempt to start it manually and see what actually happen:
$ source .env && PORT=5000 <app_version>/bin/<app_name> start
Protocol 'inet_tcp': the name <app_name>@<hostname> seems to be in use by another Erlang node
Seems like it failed to start.
What is this error about? Well everytime, our release is started, a default node name is actually provided according to our application name. Furthermore, in a single server, we can’t have two same release running with the same node name.
You can replicate the above behaviour easily in your local machine by running the following in two different terminals:
iex --cookie 1234 --sname apple
which will result in:
# In terminal one
╰─➤  iex --cookie 1234 --sname apple
Erlang/OTP 23 [erts-11.1.1] [source] [64-bit] [smp:4:4] [ds:4:4:10] [async-threads:1] [hipe]

Interactive Elixir (1.11.3) - press Ctrl+C to exit (type h() ENTER for help)
iex(apple@KW)1>

# In terminal two
╰─➤  iex --cookie 1234 --sname apple
Protocol 'inet_tcp': the name apple@KW seems to be in use by another Erlang node
To resolve this, we need to specify a different node name when starting our release:
$ source .env && PORT=5000 RELEASE_NODE=green <app_version>/bin/<app_name> start
15:46:40.449 [info] Running Web.Endpoint with cowboy 2.8.0 at :::5000 (http)
15:46:40.450 [info] Access Web.Endpoint at http://example.com
Bash script for deploying multiple Elixir releases
At this point, this is how our ./deploy.sh script looks like:
#!/bin/bash
set -e

APP_NAME="$(grep 'app:' mix.exs | sed -e 's/\[//g' -e 's/ //g' -e 's/app://' -e 's/[:,]//g')"
APP_VSN="$(grep 'version:' mix.exs | cut -d '"' -f2)"
TAR_FILENAME=${APP_NAME}-${APP_VSN}.tar.gz
# I'm using vagrant to run and test locally,
# can be replaced by your remote server ip and user.
HOST="[email protected]"

bold_echo() {
  echo -e "\033[1m---> $1\033[0m"
}

build_release() {
  bold_echo "Building Docker images..."
  docker build -t app .

  bold_echo "Extracting release tar file..."
  ID=$(docker create app)
  docker cp "$ID:/app/$TAR_FILENAME" .
  docker rm "$ID"
}

deploy_release() {
  bold_echo "Creating directory if not exist..."

  ssh $HOST mkdir -p "$APP_NAME/$APP_VSN"

  bold_echo "Copying environment variables..."
  scp .env.production $HOST:"~/$APP_NAME/.env"

  bold_echo "Copying release to remote..."
  scp "$TAR_FILENAME" $HOST:"~/$APP_NAME/$TAR_FILENAME"

  # Notice that we are extracting the tar file to it respective version
  # folder instead of replacing it at $APP_NAME as previois blog posts.

  # The reason of doing so is explained in the section of
  # "Deploying new blue and green version" of this post later on.
  ssh $HOST tar -xzf "$APP_NAME/$TAR_FILENAME" -C "$APP_NAME/$APP_VSN"

  start_release

  bold_echo "Removing remote tar file..."
  ssh $HOST rm "~/$APP_NAME/$TAR_FILENAME"
}

start_release() {
  LIVE_VERSION=$(curl -s -w "\n" "domain.app/deployment_id")

  if [ "$LIVE_VERSION" = "blue" ]; then
    deploy_version="green"
  else
    deploy_version="blue"
  fi

  bold_echo "Starting release ..."
  if [ "$deploy_version" = "blue" ]; then
    ssh $HOST "source ~/$APP_NAME/.env && PORT=4000 ~/$APP_NAME/$APP_VSN/bin/$APP_NAME daemon"
  else
    ssh $HOST "source ~/$APP_NAME/.env && PORT=5000 RELEASE_NODE=green ~/$APP_NAME/$APP_VSN/bin/$APP_NAME daemon"
  fi

}

clean_up() {
  bold_echo "Removing local tar file..."
  rm "$APP_NAME-"*.tar.gz
}


if [ "$1" = "build" ]; then
  build_release
else
  build_release
  deploy_release
  clean_up
fi
Running ./deploy.sh now the second time (initial green build) will now
deploy another copy of our application with the latest changes. The initial
build will still be running and nothing is impacted.
Promoting our green version to live
The current live version is still blue. So, in order to promote our green version to live. All we need to do is to run:
sudo ln -sf /etc/nginx/sites-available/green /etc/nginx/sites-enabled/domain.app
sudo systemctl reload nginx
Similar with how we start our release differently, we are going to rely on
/deployment_id to get the current live version and user input to decide which
version we want to promote to live. So here’s how the bash script looks like
now:
# Other code here...

promote() {
  bold_echo "Attempting to promote to $1..."
  if [ "$LIVE_VERSION" = "$1" ]; then
    echo "$1 is already the live version!"
    return
  elif [ "$1" = "green" ]; then
    target_nginx_file="green"
  else
    target_nginx_file="blue"
  fi

  ssh $HOST "sudo ln -sf /etc/nginx/sites-available/$target_nginx_file /etc/nginx/sites-enabled/domain.app && sudo systemctl reload nginx"
}


if [ "$1" = "build" ]; then
  build_release
elif [ "$1" = "promote" ]; then
  promote $2
else
  build_release
  deploy_release
  clean_up
fi
To promote green version to live, all we have to run is:
./deploy.sh promote green
Now, visiting to domain.app and you shall see your latest changes for your application is live.
Alternatively, if things went wrong and you decided to rollback to blue version, all you need to run is just:
./deploy.sh promote blue
Do note that, at this point, we are running 2 copies of our application on our remote server, which means we are consuming twice as much resources as well.
Running migration and console
Assuming you have follow the guide to setup ecto migration on the official Phoenix Documentation, you should be able to run migration by running the following comamnd:
$ source ~/$APP_NAME/.env && ~/$APP_NAME/$version/bin/$APP_NAME eval 'AppName.Release.migrate()'
similarly, to run the remote console is just as simple as:
$ ~/$APP_NAME/$version/bin/$APP_NAME remote
Notice that we don’t need to source .env while running remote command
because it is connecting to our running process.
More details will be cover below.
Running migration
Let’s assume we have released both version 0.1.0 as blue and 0.1.1 as
green. To run migration for the 0.1.0 release, it’s the same as usual:
$ source ~/app_name/.env && ~/app_name/0.1.0/bin/app_name eval 'AppName.Release.migrate()'
For the latest 0.1.1 version,
to run the migration is also the same as above:
$ source ~/app_name/.env && ~/app_name/0.1.1/bin/app_name eval 'AppName.Release.migrate()'
To simplify things, we can write a bash script to do this:
migrate() {
  LIVE_VERSION=$(curl -s -w "\n" "$DOMAIN/deployment_id")

  if [ -z "$1" ]; then
    bold_echo "Setting blue green version to $LIVE_VERSION since none specified."
    deploy_version=$LIVE_VERSION
  else
    bold_echo "Setting blue green version to $1"
    deploy_version=$1
  fi

  if [ "$deploy_version" = "green" ]; then
    version_file="green_version.txt"
    env="source ~/$APP_NAME/.env && RELEASE_NODE=green PORT=5000 "
  else
    env="source ~/$APP_NAME/.env && PORT=4000 "
    version_file="blue_version.txt"
  fi

  version=$(cat $version_file)
  bold_echo "Running migration for database for release $version..."

  ssh $HOST "$env ~/$APP_NAME/$version/bin/$APP_NAME eval 'AppName.Release.migrate()'"
}

if [ "$1" = "migrate" ]; then
  migrate "$2"
fi
Running remote console
Now, let’s say that we want to run a remote console on our 0.1.0 deployed as
blue. It is same as usual:
$ ~/app_name/0.1.0/bin/app_name remote
However, if we want to do the same For the 0.1.1 version deployed as green,
the following will not work as expected
$ ~/app_name/0.1.1/bin/app_name remote
and you’ll get the following error message complaining that the node is down:
Erlang/OTP 23 [erts-11.1.8] [source] [64-bit] [smp:2:2] [ds:2:2:10] [async-threads:1] [hipe]

Could not contact remote node app_name@hostname, reason: :nodedown. Aborting...
Remember when we spin up our second copy and we specify RELEASE_NODE=green?
It’s because of that.
To resolve it, we need to specify our node name explicitly again when running the command:
RELEASE_NODE=green ~/app_name/0.1.1/bin/app_name remote
And voila, it works!
Why eval works without additional environment configuration?
If you run:
$ ~/app_name/0.1.1/bin/app_name
You’ll get a more detailed description of each command. And if you read about
eval, you’ll find that it actually execute the command on a new non booted
system.
The known commands are:

    ...
    eval "EXPR"    Executes the given expression on a new, non-booted system
    rpc "EXPR"     Executes the given expression remotely on the running system
    remote         Connects to the running system via a remote shell
    ...
Hence, unlike remote command that connected to our running system, eval is
not affected as it run on a whole new system.
That also explain why we need to source .env for eval because its running
on another new system.
Deploying new blue and green version
That’s not the end yet. We just cover the initial deployment part so far (the
first two deployments). Next up, we need to deployed new version for both
blue and green copy of our application.
The main difference between the subsequent and the initial deployment is that we need to stop our running application before we start the newer version. The script and process is fairly similar to the script to deploy new release in our previous blog post
Hence, to deploy our new blue/green version, we need to first stop the old blue/green version. Once the old process is stop successfully then we can start the new one.
For example:
- If live version is green, we will stop old blue version, and start a new one as blue version. Since we want to ensure zero downtime deployment, hence we can’t be stopping the existing live green version of the application.
- If live version is blue, we will stop the old green version.
Sounds straightforward right? However, it’s not without its own problem.
What are the current version running for blue/green version?
Since, we might have 2 application (with different version) running on our
server, we cannot just extract our release into $APP_NAME format as
before.
Instead, we need to extract the release for different version to different
folder in this format $APP_NAME/$APP_VSN:
# Old build script
ssh $HOST tar -xzf $APP_NAME/releases/$TAR_FILENAME -C $APP_NAME

# New build script
ssh $HOST tar -xzf "$APP_NAME/$TAR_FILENAME" -C "$APP_NAME/$APP_VSN"
which, allow us to run multiple version of our application at the same time.
With this changes, we can stop the running application with:
ssh $HOST "~/$APP_NAME/$version/bin/$APP_NAME stop"
However, it’s not as straightforward as it seems. We still need to know the current blue/green version our applications are running.
Solution
To resolve this, we need to get our last deployed blue/green version from somewhere every time we deploy. There are two ways we can get the version data:
- Expose a API endpoint
/versionto return the running version. - Store our deployed version somewhere in a data store when we deploy
Using /version
We can extract our blue/green running version in our bash script by doing something like:
if live_version == "blue" do
  curl "localhost:5000/version"
else
  curl "localhost:4000/version"
end
We would need to handle cases where none of blue/green version is deployed before. This can be quite tricky to write in bash.
Technically, I think is still possible to solve it with, “if the connection to the server failed, we skip the stopping phase”.
But for now, I’ll just leave it to you all if you prefer to do it this way.
Store version in a file
Instead, I am going to just write it to a file directly.
# Deploying to blue with 1.0.0
echo 1.0.0 > blue_version.txt

# Deploying to green with 1.0.1
echo 1.0.1 > green_version.txt
We are using > to overwrite the file instead of appending it.
Alternatively, you can also write it to a object storage like AWS S3 or Google Cloud Storage.
Since, we are writing to a file here, to check if we have deployed before is as simple as using bash specific operator to check if a file exist:
if [ -f filename ]; then
  echo "filename exist"
fi
Bash script for deploying new blue/green version
Combining the above, the final bash script for this part will looks like this:
start_release() {
  LIVE_VERSION=$(curl -s -w "\n" "domain.app/deployment_id")

  if [ "$LIVE_VERSION" = "blue" ]; then
    version_file="green_version.txt"
    deploy_version="green"

    # Since we need to check if our process is running with pid command
    env="RELEASE_NODE=green"
  else
    version_file="blue_version.txt"
    deploy_version="blue"
    env=""
  fi

  # Check if the file exist.
  # If it doesn't exist, it means that we haven't deploy
  # the initial version yet.
  # Hence, we can skip the stopping phase entirely.
  if [ -f $version_file ]; then
    version=$(cat $version_file)

    # Don't exit on error so we can caputure
    set +e
    ssh $HOST "$env ~/$APP_NAME/$version/bin/$APP_NAME pid"

    if [ $? -ne 0 ]; then
      bold_echo "$APP_NAME $version is not running anymore..."
    else
      bold_echo  "Stopping previous $deploy_version, release $version..."
      ssh $HOST "$env ~/$APP_NAME/$version/bin/$APP_NAME stop"

      bold_echo  "Waiting $deploy_version, release $version to stop..."
      ssh $HOST "$env ~/$APP_NAME/$version/bin/$APP_NAME pid"
      while [ $? -ne 1 ]
      do
        bold_echo  "Waiting $deploy_version, release $version to stop..."
        ssh $HOST "$env ~/$APP_NAME/$version/bin/$APP_NAME pid"
      done
    fi
    set -e
  fi


  # Start Release
  if [ "$deploy_version" = "blue" ]; then
    ssh $HOST "source ~/$APP_NAME/.env && PORT=4000 ~/$APP_NAME/$APP_VSN/bin/$APP_NAME daemon"
  else
    ssh $HOST "source ~/$APP_NAME/.env  && PORT=5000 RELEASE_NODE=green ~/$APP_NAME/$APP_VSN/bin/$APP_NAME daemon"
  fi

  # Update our version in our version file.
  # So that next time, we know this is the version we are currently
  # running
  echo $APP_VSN > $version_file
}
Glue it all together
Finally, the outcome of it is as follow:
#!/bin/bash
set -e

# Getting your app name from mix.exs
# I probably copy the code from somewhere so...
APP_NAME="$(grep 'app:' mix.exs | sed -e 's/\[//g' -e 's/ //g' -e 's/app://' -e 's/[:,]//g')"
APP_VSN="$(grep 'version:' mix.exs | cut -d '"' -f2)"
TAR_FILENAME=${APP_NAME}-${APP_VSN}.tar.gz

# I'm using vagrant to test out the application.
# So change this to your own host.
HOST="[email protected]"

# The domain name to curl the blue/green version of your
# service.
DOMAIN="domain.app"

bold_echo() {
  echo -e "\033[1m---> $1\033[0m"
}

build_release() {
  bold_echo "Building Docker images..."
  docker build -t $APP_NAME .

  bold_echo "Extracting release tar file..."
  ID=$(docker create $APP_NAME)
  docker cp "$ID:/app/$TAR_FILENAME" .
  docker rm "$ID"
}

deploy_release() {
  bold_echo "Creating directory if not exist..."
  ssh $HOST mkdir -p "$APP_NAME/$APP_VSN"

  bold_echo "Copying environment variables..."

  # I'm storing my production environment variable in my local machine
  # and scp it over to the host every time.
  # Not the recommended way to manage your sercret.
  scp .env.production $HOST:"~/$APP_NAME/.env"

  bold_echo "Copying release to remote..."
  scp "$TAR_FILENAME" $HOST:"~/$APP_NAME/$TAR_FILENAME"
  ssh $HOST tar -xzf "$APP_NAME/$TAR_FILENAME" -C "$APP_NAME/$APP_VSN"

  start_release

  bold_echo "Removing remote tar file..."
  ssh $HOST rm "~/$APP_NAME/$TAR_FILENAME"
}

start_release() {
  LIVE_VERSION=$(curl -s -w "\n" "$DOMAIN/deployment_id")

  if [ "$LIVE_VERSION" = "blue" ]; then
    version_file="green_version.txt"
    deploy_version="green"

    # Since we need to check if our process is running with pid command
    env="RELEASE_NODE=green"
  else
    version_file="blue_version.txt"
    deploy_version="blue"
    env=""
  fi

  # Check if the file exist.
  # If it doesn't exist, it means that we haven't deploy
  # the initial version yet.
  # Hence, we can skip the stopping phase entirely.
  if [ -f $version_file ]; then
    version=$(cat $version_file)

    # Don't exit on error so we can caputure
    set +e
    ssh $HOST "$env ~/$APP_NAME/$version/bin/$APP_NAME pid"

    if [ $? -ne 0 ]; then
      bold_echo "$APP_NAME $version is not running anymore..."
    else
      bold_echo  "Stopping previous $deploy_version, release $version..."
      ssh $HOST "$env ~/$APP_NAME/$version/bin/$APP_NAME stop"

      bold_echo  "Waiting $deploy_version, release $version to stop..."
      ssh $HOST "$env ~/$APP_NAME/$version/bin/$APP_NAME pid"
      while [ $? -ne 1 ]
      do
        bold_echo  "Waiting $deploy_version, release $version to stop..."
        ssh $HOST "$env ~/$APP_NAME/$version/bin/$APP_NAME pid"
      done
    fi
    set -e
  fi

  # Start Release
  if [ "$deploy_version" = "blue" ]; then
    ssh $HOST "source ~/$APP_NAME/.env && PORT=4000 ~/$APP_NAME/$APP_VSN/bin/$APP_NAME daemon"
  else
    ssh $HOST "source ~/$APP_NAME/.env && PORT=5000 ELIXIR_ERL_OPTIONS='-sname green' ~/$APP_NAME/$APP_VSN/bin/$APP_NAME daemon"
  fi

  # Update our version in our version file.
  # So that next time, we know this is the version we are currently
  # running
  echo $APP_VSN > $version_file
}

promote() {
  LIVE_VERSION=$(curl -s -w "\n" "$DOMAIN/deployment_id")

  bold_echo "Attempting to promote to $1..."
  if [ "$LIVE_VERSION" = "$1" ]; then
    echo "$1 is already the live version!"
    return
  elif [ "$1" = "green" ]; then
    target_nginx_file="green"
  else
    target_nginx_file="blue"
  fi

  ssh $HOST "sudo ln -sf /etc/nginx/sites-available/$target_nginx_file /etc/nginx/sites-enabled/$DOMAIN && sudo systemctl reload nginx"

  LIVE_VERSION=$(curl -s -w "\n" "$DOMAIN/deployment_id")
  bold_echo "Promoted live to $LIVE_VERSION"
}

clean_up() {
  bold_echo "Removing local tar file..."
  rm "$APP_NAME-"*.tar.gz
}

migrate() {
  LIVE_VERSION=$(curl -s -w "\n" "$DOMAIN/deployment_id")

  if [ -z "$1" ]; then
    bold_echo "Setting blue green version to $LIVE_VERSION since none specified."
    deploy_version=$LIVE_VERSION
  else
    bold_echo "Setting blue green version to $1"
    deploy_version=$1
  fi

  if [ "$deploy_version" = "green" ]; then
    version_file="green_version.txt"
    env="source ~/$APP_NAME/.env && RELEASE_NODE=green PORT=5000 "
  else
    env="source ~/$APP_NAME/.env && PORT=4000 "
    version_file="blue_version.txt"
  fi

  version=$(cat $version_file)
  bold_echo "Running migration for database for release $version..."

  ssh $HOST "$env ~/$APP_NAME/$version/bin/$APP_NAME eval 'AppName.Release.migrate()'"
}

if [ "$1" = "build" ]; then
  build_release
elif [ "$1" = "start" ]; then
  start_release
elif [ "$1" = "promote" ]; then
  promote "$2"
elif [ "$1" = "migrate" ]; then
  migrate "$2"
else
  build_release
  deploy_release
  clean_up
fi
Wrap Up
While this blue green deployment works for our simple use case, there are a few drawbacks that one need to be aware of.
1. Every new deployment need to have their version bump.
Since when we deploy, we are extracting the tar release and overriding the version folder, everytime we deploy a new code, we need to bump our version so that older version code (that might be running) won’t get replaced.
If you forget to bump your version when deploying new code, weird things might happen. I haven’t find out the possible consequences yet, but will probably update it here once I have a clearer idea.
2. Multiple Nodes
When you scale beyond a single node, while it could work, it becomes tricky to manage. In theory, you can just loop through and execute the script separately (or together). But it becomes tricky when you consider the possibilities with multiple servers:
- What if we successfully deploy to server A but fail at server B, C and D?
- How do we keep track of different version of our blue/green application on N different servers?
- When you deploy to multiple servers, the next step you might want to consider is to do rolling release. How would you handle that?
As your needs grow, it will feel like you are reinventing the wheels.
3. Zero downtime for Phoenix Channels
While we might have zero downtime for our API requests, this setup is not tested on Phoenix Channels or websockets. In theory, there will be a minimal downtime.
If you are looking for zero downtime deployment with this method, be sure to do your own testing.
4. Zero downtime for Database Migration
Zero downtime in your application deployment does not mean you’ll have zero downtime service. If you have a database migration that lock your whole table, you’re going to definitely have some downtime (this would be brief if you have a small dataset).
So make sure, you understand your system well and the database migration that you’ll be running. I also recommend this blog post from Braintree regarding safe operations for high volume PostgreSQL if you wish to learn more regarding this area.
Key takeaway here is, it’s important to understand different parts of your systems and how they affect each other. While blue green deployment ensure minimal downtime for your application process, there are still other subsystems in your system that will cause your service downtime.
More importantly, it’s to understand what do your users of your system care about. Even Google doesn’t strive for 100% uptime.